Whether your house is already built and you want a more energy efficient basement, or you’re building or planning a new house and you want to make sure you’ll spend as little as possible on keeping the basement warm and/or cool, these simple tips will help you have the most energy efficient basement money can buy.
First we’ll discuss some of the motivations for making your basement more energy efficient. Then we’ll look at the major factors in determining the energy efficiency of an existing or new basement, including:
- Moisture issues
- Exterior walls
- Windows
- Floors
- Heating and cooling
- Lighting
We’ll also look at specific basement rooms and uses and how they can be fine-tuned to give you an energy-efficient basement:
- Washroom
- Laundry room
- Workroom
- Home office
- Home entertainment center
- Wine cellar
- Beer fridge
- Hot water
Motivations for your energy efficient basement
The obvious motivation for an energy efficient basement is that you want to save money (and save the planet) while keeping your basement comfortably warm or cool, depending on the season.
Another motivation for an energy efficient basement may be that your basement is so poorly insulated or so damp that you can’t get the temperature or humidity level into your comfort zone without spending a fortune heating or running a dehumidifier. Many people in older homes suffer from unpleasantly humid basements, especially in warmer months of the year, and upgrading to an energy efficient basement usually involves tackling this humidity problem head on.
But there are other motivations most of us haven’t thought about, that go beyond our own comfort and pocketbook. An energy efficient basement is a great example of the maxim of “Think Global, Act Local”.
When my wife was pregnant with our second child, we decided we needed more space in our small home. The options were to buy a bigger home, enlarge an existing extension to add another room, or dig out and finish the basement to put a home office and spare bedroom down there.
The third option, digging out and finishing our basement, was the most environmentally friendly, mainly because of the lower land-use involved. Consider this:
- Building an extension increases the land area needed for the house. There’s less green space for plants to soak up carbon dioxide, and less porous soil in the area to soak up rainfall and maintain the local water table – an issue in many dryer parts of the world.
- Building another extension increases the square footage of roof, meaning more heat generated both inside your house and in your neighborhood. Roofs convert a lot of solar radiation into heat energy (which gets trapped in the atmosphere, thanks to the greenhouse effect). Grass, trees, and other vegetation convert some of that energy to chemical energy through photosynthesis, and reflect much of it back into outer space.
- Buying a bigger house is usually equivalent to a bigger extension or bigger roof, since a bigger house will cover more land than the one you’re already living in. And chances are, a bigger house is in a more suburban neighborhood, which means more driving, ergo more pollution.
Three months after my wife got pregnant, I started digging. (We had to underpin our basement since the basement was only 6 feet from floor to ceiling. I did it all – 50 cubic yards of dirt and rubble out, 15 cubic yards of sand, gravel and cement in!).
So if you want to justify converting your unfinished basement into an energy efficient basement, over and above the energy savings you’ll realize, just compare the environmental impact of upgrading your basement to that of adding an extension or moving to a bigger house.
Moisture issues
If you’re considering an energy efficient basement upgrade, you have to tackle any moisture issues you already have. Don’t just throw insulation on the exterior walls, put up drywall, and hope for the best.
Moisture seeping in from outside your house will get into the insulation and, for fiberglass or other fiber-based insulation, will dampen it and reduce its efficiency. The moisture can also cause mold and mildew to grow on the drywall and baseboards, and this mold and mildew are dangerous to your health. So the first thing to do is get control of humidity problems in your basement. No point having an energy efficient basement that’s making you sick, or is slowly rotting.
My article on energy efficient dehumidifiers has a number of tips on how to control basement humidity problems, so in this article I focus on humidity control in major renovations for energy efficient basements.
The keys to controlling humidity of an energy efficient basement from the outside are:
- Getting water sources away from your foundation
- Ensuring adequate drainage at the foundation footings for water that does get down there
- Ensuring that the outside of the foundation walls is insulated and waterproofed, or if this is not possible, that the inside of the walls is parged to cut down on moisture entering the house
- Getting good air flow through the basement to get the humidity out (unless the problem is humidity coming in from humid outside air, for example in hot, muggy weather)
- Controlling humidity using a dehumidifier or your HVAC system.
We’ll cover most of these issues in more detail below as we discuss the different aspects of building an energy efficient basement in a new home, or renovating an existing basement and turning it into an energy efficient basement.
Building or remodeling your basement
If you are building a new home, the key things to consider for an energy efficient basement are adequate depth of the basement living space, proper insulation and moisture control, how you light your basement, and the efficiency of the appliances and devices you install in it.
Adequate depth
It is far more energy efficient to build your basement right the first time, than to build a crawl-space or crouch-over basement initially, then dig it out a few years or decades lager. (Believe me, I know how much energy it takes to dig out a basement – four months of sweat and tears!)
Remember when planning your energy efficient basement to include enough room for the floor joists of the floor above; the drywall or hung ceiling below the joists; the raised floor above the concrete slab you should plan on putting at the bottom of the basement; the thickness of the concrete slab (at least 3 inches) and the gravel drainage below that (another 4 inches).
Check your local building codes; you may need to go much deeper than the minimum depth you want, in order to conform with those codes – even if your older home doesn’t currently comply. For example, my house had 6 foot ceilings in the basement before I renovated it. But my local permit office would not grant me a building permit unless I made at least 75% of the basement surface area 6’11” high after finishing, even though 6’4″ would have been plenty high.
One advantage of depth is that the lower into the ground you go, the more of the earth’s natural buffering capacity you get against the extremes of cold and heat. This is why an energy efficient basement is often so much cooler in summer than other parts of your house – the ground acts like a giant heat sink.
Of course the flip side of this is that the lower you go, the closer to the water table you get (or the further under it). So moisture control becomes a bigger concern.
Exterior walls
For exterior walls, your energy efficient basement needs to address two major issues: insulation, and moisture control. Remember that for moisture control you need to not only block incoming moisture from exterior walls, but keep the water from getting in the space around the outside walls in the first place; for tips on this see my article on energy efficient dehumidifiers, where I point out ways to make your dehumidifier more efficient by not letting water inside in the first place!
Exterior wall insulation outside the walls
For an energy efficient basement in a new home construction, the best solution is to insulate the outside of your walls. This is usually done with foam sheet insulation laid below ground against the masonry foundation. There are even foundation systems in which the form for the concrete foundation is an insulating foam sheet that stays in the ground after the foundation is poured.
You can also install foam sheet insulation outside your existing basement, if you can dig up around the perimeter of the house without causing too much damage to driveway pavement, side-structures such as porches and extensions, trees and other landscaping features. You may need to do this anyhow if you have serious moisture problems in your basement. This is best done by a professional foundation contractor or waterproofing contractor, but can be done by an experienced do-it-yourself handy-person.
Dig a trench down to the bottom of the foundation. If there is no drainage tile below the poured slab, install drainage tile below the outside of the foundation. If the masonry is cracked or damaged you may first want to cover it in a tar-based sealant. Install insulating foam panel against the walls, and seal all joints in the foam panel.
Make sure the foam is buried at least 6 inches from the surface, especially if you have wood framing above the foundation, to prevent termites from making a passage between the wall and the insulation and from there entering the wood framing.
This solution addresses both the incoming moisture problems and the insulation requirements for new or upgraded energy efficient basements.
Exterior wall insulation inside the walls
Insulating outside your exterior walls is often too expensive or impractical in existing homes. You can insulate the inside of your basement walls but you may exacerbate the problems associated with moisture if you don’t do the job correctly.
Parging: If moisture is seeping into your walls, parge the masonry walls to seal any cracks and strengthen any weak or porous masonry. This will help prevent water from seeping in from outside.
Vapor barrier: Vapor barrier should be outside the insulation if you are in a hot climate and only cool your home; it should be on the inside if you are in a cold climate and are mainly heating your home. Consult your local city building permits department to find out what are the suggested or mandated insulation and vapor barrier configurations for energy efficient basements in your area.
Framing: If possible, leave a gap between your framing and the exterior walls, to prevent moisture from the masonry from causing wood rot in your framing. Use small spacers behind 2×3 studs, rather than 2×4 studs against the outside wall, and you’ll still have room to install the standard insulation for 2×4, 16-inch-stud construction.
Insulation: If there is any likelihood of moisture getting into your basement, use a rigid foam insulation rather than batt or other fiber-based insulation. Moisture seeping through exterior walls will dampen fiber insulation and reduce its R value significantly within a few years, so you’ll start with an energy efficient basement and in a few years be losing as much heat to outside as before the renovation. Moisture will not have much effect on the R value of foam insulation. Buy the highest R value insulation you can – you can get an R value of 6 per inch in some insulating foam sheets. If you want both insulation and waterproofing, you could consider having Icynene insulation or other spray foam insulation applied to exterior walls after framing but before drywall is installed.
Other places you should insulate
A couple of other important things to consider about basement insulation:
- In an older house, where a shower stall is already installed against an outside wall, check the insulation level behind the shower. A prior owner or contractor may have installed the shower without adequate insulation. If you are remodelling or can access the wall space behind it, inject foam insulation or otherwise upgrade the insulation. You’ll have more comfortable showers and you’ll cut down on overall heat loss.
- Insulate the perimeter of your basement ceiling (an area called the ‘rim joists’), from the outside walls to about 16″ to 24″ from the outside walls, to prevent moisture from creeping in between the upstairs floor and the basement ceiling.
A caution on sealing of exterior walls – radon risks
While you’ll have a much more energy efficient basement if you seal all outside air leaks, watch out for radon problems. If you are in an area of high levels of ground-emitted radon, have your basement radon level tested. (You can test radon levels yourself with a radon test kit.)
If you do have radon, you can make your home more healthy at the same time you upgrade to an energy efficient basement, by installing an energy efficient air exchanger as part of an energy efficiency upgrade. An air-to-air heat exchanger allows a steady outflow of stale indoor air, while recapturing much of the heat from the outflow and pumping it back into your house with fresh air from outside.
Panasonic is a leader in heat recovery ventilators. Heat recovery ventilators work either by passing the two airstreams through separate conduits with a large surface of heat exchange between them, or by passing one airstream through a porous ceramic structure, and reversing the airflow frequently. In the reversing design, outgoing air warms the ceramic as it leaves the building; when the fan reverses, incoming air picks up the heat that was captured in the ceramic, and draws it back into the room.
Note that these heat exchangers work for both indoor heated air and indoor air-conditioned air. A heat exchanger in your basement will not only keep your basement free of radon, but keep the air throughout your house fresh.
Windows
For a new home, plan the windows in your energy efficient basement to take advantage of natural light. Window wells allow you to build windows whose bottom sill extends deeper into the basement, and provides more light. Remember, sunlight is free! And be sure to order the most energy efficient windows on the market, preferrably double- or triple-glazed, low-E windows with an ENERGY STAR or ENERGY STAR Most Efficient rating
If you’re remodeling to get the most energy efficient basement you can afford, windows are a great place to start. In older houses the basement windows are often the most neglected and leaky windows in the house, as well as being an easy entry target for burglars. Replacing these with energy efficient windows is usually quite inexpensive and if you’re moderately handy you can even do the installation yourself.
If you don’t use your basement (or a room in your basement) much in the winter, buy some 2″ pink or blue insulating foam and cut rectangles out of it of the exact dimension of each framed window opening. Cut two small (1/2″) holes four inches apart near the base of each rectangle, and put a short loop of 3/8″ rope through the two holes. Push the rectangles up against the windows to provide an extra R6 or so of insulation on windows where you don’t need the natural light they provide. The holes and the rope loop make it easier to get the rectangle out later, while still allowing it to fit tightly in the opening.
Floors
For a finished basement, you may want to install something more comfortable and visually appealing than a simple concrete slab. But do not install wall to wall carpet, as the moisture buildup that occurs in almost all basements will invite mold to grow in your carpet.
Consider installing a subfloor between the concrete slab and your flooring, to keep an air barrier between the flooring and the concrete. This will increase comfort on bare feet and prevent moisture rising from the concrete slab from dampening your flooring.
Heating and cooling
If you’re turning an unfinished basement into a finished energy efficient basement, you’ll need to consider how much additional heating and cooling load you’re putting on your existing HVAC system. Consult with an HVAC specialist to determine if your current furnace and air conditioning system have the capacity to deal with the added heat load. Because a well-insulated energy efficient basement should lose very little heat to the outside in winter, and tends to stay naturally cool in summer, it is unlikely you’ll need to upgrade your furnace or AC, unless a large percentage of your basement is above grade. At worst, you may need to install space heaters in parts of your basement to give your furnace a little help on colder nights.
If you can handle a relatively cold basement in winter, having a dehumidifier there to control moisture in the spring and fall will also produce heat so your upgraded, energy efficient basement may be comfortably warm except in the coldest months, even if you don’t upgrade your heating system.
If you have forced air, your forced air louvers will likely be installed from the ceiling in the case of a basement remodel, because that’s where the furnace ductwork is located. Hot air rises, so putting ducts in the ceiling is not terribly efficient – it tends to stay quite warm at the ceiling, while the floor stays cold.
For this reason it’s especially important to install a basement cold air return along with the hot air ducts; the cold air return should be at floor level (for example, embedded between two studs with a floor-level grate on the wall, preferably on an interior wall) to draw cold air out from below so that the warm air gets drawn down.
A cold air return will also help spread the cool basement air through the house in summer if you have central air conditioning, which will both keep the overall house temperature lower for the same amount of energy, and help reduce basement humidity.
Make sure your forced air ducts are properly adjusted for the season. For example, you don’t need to pass air through the humidifier of your furnace in summer.
Seal your duct work as much as possible. If you’ve got the basement ceiling down for renovations, that’s an ideal time to seal every possible opening in the ductwork so that heat goes where you want it, not where it leaks out.
For a low or mid-efficiency combustion furnace or a gas hot water heater, you may save energy by installing an outside-air intake vent that draws air into the furnace room to provide oxygen for the furnace or water heater to burn. This prevents the combustion process from sucking in the warm air from other parts of your house, which in turn draws cold air in through cracks around windows and doors. As a result your house will stay warmer and feel less drafty.
While we’re on the topic of furnaces and water heaters – switching from combustion heating to a high efficiency heat pump is the best way to go. Even in cold climates, they are affordable, very energy efficient, carbon-neutral (or at least as carbon-neutral as your electricity supply is), and provide the following other benefits:
- Heat pump whole-house heating requires no outside air, unlike low- to mid-efficiency gas furnaces
- Heat pump hot water heaters can cool and dehumidify your basement in summer, while also heating your water.
That’s the setup I have – a Carrier Infinity Heat Pump HVAC system and a Rheem heat pump hot water heater. The water heater takes air from the basement, extracts heat from it, and exhausts cooler air. In the cooler months I vent both the intake and output to the out of doors, so I don’t freeze the basement, In warmer months I use that cool, dry air to cool and dehumidify the basement.
Install a new heating or AC system if… your HVAC specialist determines the energy efficient basement upgrade will increase the heating or cooling load beyond what the current system can carry, or if the system is close to capacity and is older or inefficient. The perfect time to upgrade your furnace and air conditioner is when you have full access to the ductwork, the furnace area, the electrical system, and the outside walls where air conditioning pipes are drawn in. Remember that it’s more energy efficient to do one remodeling now, than to do one now, then rip a bunch of the work out to put in a new HVAC system later. And please, go for a heat pump, not a new gas furnace – we need to stop all uses of fossil gas, because of its serious climate impacts. One of the great things about a heat pump HVAC system is that it provides both cooling and heating in one package.
Lighting
I see three major sources of energy waste in basements, as far as lighting is concerned. The energy efficient basement avoids all three types of waste. Here they are:
- Halogen pot lights or track lighting
- Lack of natural lighting
- Lights left on by mistake
You may be tempted to install halogen pot or track lights in your basement. Pot lights are popular because basements tend not to have much headroom, and a pot light is recessed into the ceiling so they don’t affect the usable height of the room. Halogen pot lights in particular are popular because of the strong, natural, direct light they provide.
But remember that halogen lights are no more efficient than incandescent lights – in spite of what most people think. So if you’re going to use your basement for more than storage, plan to install energy LED house lights, instead of halogen lights. If you already have halogen lights installed, bear in mind that several types of halogen light bulbs, including GU10 and MR13, have LED replacements available that are far more efficient.
When building a new house, make sure you plan for adequate natural light by including windows in every room, where possible.
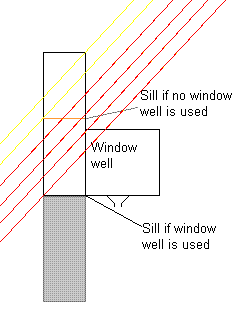
You can get even more direct and indirect sunlight in by incorporating window wells into the design; window wells allow significantly more light in. The illustration to the left shows the amount of exterior light, from a distant light source such as the sun. that gets into your house; yellow indicates light entering a normal window with an above-ground window sill, while red indicates light that enters through a window well.
You can also cover window well openings with a clear plastic window well cover to increase the insulation level of the window, and to reduce the risk of someone falling into it!
Other ways of taking advantage of natural lighting in basements include painting in lighter colors, which reflect light rather than absorb it, and installing solar light tubes or “sun tubes” in ceilings and walls to draw sunlight in from indirect sources. Some solar tubes include a built-in electrical light so you get light from them whether or not there is daylight outside.
It’s easy to forget to turn off the lights in your basement, especially in a back room or a seldom used room such as the furnace room or a crawl space. I recommend installing timer switches on such lights if you’re prone to forgetting them on, so that the lights automatically turn off after a half hour or an hour. If the chances of you spending longer than an hour in your furnace room are slight, the timer will be no bother and will ensure you don’t use a lot of electricity forgetting to turn off the lights.
And remember to turn off lights in your basement when you step out for even a minute – to answer the door, or grab a snack, or whatever – because there’s a good chance you’ll get distracted, and forget to go back down, and the lights will be on a while for no good reason.
The energy efficient basement, room by room
Let’s look at specific basement rooms and uses and how they can be fine-tuned to give you an energy-efficient basement.
Washroom
Although this isn’t strictly an energy efficient basement issue, you should install a low-flow toilet in your basement washroom, rather than the wasteful 13+ liter toilets of yesteryear. Particularly if you use this toilet often, go for the ultra-low-flush toilets now available that provide two different flush levels, one for liquids, one for solids. You’ll save on your water and sewer bills – and indirectly you’ll be saving water. It takes a surprising amount of energy to treat and chlorinate and pump your water to you, if you’re on a city water system, and while you don’t pay directly for that energy, the energy costs are built into your water rate.
Laundry room
Obviously you should buy the most energy saving washer and energy efficient dryer available. But for a truly energy efficent basement, include an indoor clothesline or clothes rack in your drying plans for those times when it’s too wet or cold to use the outdoor laundry line.
Workroom
The main source of wasted energy in a workroom, other than things like lights left on and heat loss that are common throughout a basement or house, are battery chargers for tools. If you do recharge a tool battery, it’s better to recharge it at a time when you know you’ll be back in the workroom soon, so you can unplug it, or to recharge it upstairs where you’ll notice it sooner. Some types of AC to DC converters can consume almost as much electricity after the battery for your tool is fully charged as while it’s charging. And leaving batteries in the charger once they are fully charged can shorten battery life.
Home office
If you put a home office in your basement, strive for as much natural light as possible, not only to reduce the cost of lighting the room, but to reduce the strain on your eyes from artificial light. Use energy efficient LED pot lights for the best office lighting.
For your home office computer equipment, don’t leave it running when you’re not using it. Even ENERGY STAR equipment consumes some power in its energy saving mode, and many peripherals are big energy hogs when plugged in, even when the equipment is turned off. Use a power bar and turn everything off when you’re not using it. See the Personal computers and Other phantom loads sections of my How to save electricity page for more on that.
Home entertainment center
As with your home office, unplug your home entertainment center when not in use. And check how much electricity your TV uses. The Kill-a-watt meter is a great tool for measuring the power consumption of devices like plug-in lights, electronic equipment, and 120 volt appliances. Buy one and use it to measure home entertainment power consumption. You may discover a big energy waster in an old TV or DVD player. At the very least, turn them off when not in use. Even better, if you use your home entertainment center all the time, upgrade to a new TV. Today’s ENERGY STAR televisions are up to 25% more efficient than standard TVs.
Wine cellar
There are four key factors to conserving and aging wine properly: constant temperature and humidity, and ideal temperature and humidity. If you can get the first two right and do not badly on the other two, you’ll be able to keep fine wine a long time without having to resort to energy-intensive techniques such as a refrigeration system for a custom wine cellar, or to a wine refrigeration unit.
The more ups and downs in temperature a wine bottle experiences, the faster it ages. Corked wines can also experience cork dry-out or deterioration from excessive dryness or humidity. And the warmer the average temperature, the faster a wine ages. So strive for constant temperature and humidity, and try to keep the temperature as close to 13 F or 55C as your energy budget allows you. Personally I would favor a higher storage temperature – say 16-18C, or 61-64F – to save energy, even though the wine will age faster and not quite as well. But I’m no wine snob.
To get the temperature constant in your wine cellar, build it with at least 6 inches of high-R-value insulation on all sides, and install an energy saving door as well. This will buffer any temperature changes from other rooms in your basement or upstairs, so that the temperature rises or falls more slowly in the wine cellar than in surrounding rooms. If you can protect adjoining outside walls from excessive sunlight or heat build up (such as a covered deck that warms the air below when sunlight strikes the deck), you will probably be able to keep your wines decently well without resorting to electric refrigeration.There’s a good chance you don’t actually need a wine refrigeration unit. If you’re truly devoted to cutting energy use, you can probably live without one and you’ll save energy in doing so. But at the very least, use a Kill A Watt meter or other electricity monitor to figure out how much energy your wine cellar uses. That way you can decide how much electricity you’re willing to burn – and how much CO2 that will put in the atmosphere – in exchange for the pleasure of well preserved wines.
Beer fridge
The basement beer fridge, on the other hand, is an energy waster plain and simple. Almost all beer refrigerators are old, leaky, no longer working at full efficiency, and even in their prime were far less efficient than today’s models. Shut down and get rid of your basement beer fridge and you’ll have a much more energy efficient basement.
Hot water
Wrap your electric hot water heater tank in a water heater jacket. These insulation jackets are not recommended for gas water heaters, and may violate fire codes in some areas, but people who have installed them have reported some savings. The key safety issue is to ensure there is no jacket material close to the pilot light area or anywhere else close to the combustion area or the exhaust area at the top. If you have an electric resistance or electric heat pump water heater, there’s no risk to wrapping an additional layer of insulation around the outside, and it will save a little energy.
Wrap your hot and cold water pipes with pipe insulation as far as possible. Armaflex insulation is one good quality, very energy efficient brand of pipe wrap. The best time to wrap basement pipes with pipe insulation is when you have gutted the basement and installed new plumbing – before you finish remodeling.
Leave a Reply
Want to join the discussion?Feel free to contribute!